
Choose your trusted traveler program
Before you start an application, you need to match your travel habits to the right Trusted Traveler Card. The U.S. Customs and Border Protection (CBP) offers several programs, each designed for specific routes and entry points. Picking the wrong one wastes time and money, especially since most applications are non-refundable.
The table below breaks down the four most common programs. Use it to see which card fits your itinerary.
| Program | Cost | Coverage | Best For |
|---|---|---|---|
| Global Entry | $100 | U.S. arrival airports + TSA PreCheck® | International travelers |
| NEXUS | $50 | U.S./Canada land, air, marine | Cross-border commuters |
| SENTRI | $122.50 | U.S./Mexico land ports | Southwest border travelers |
| TSA PreCheck® | $78 | U.S. domestic security lanes only | Domestic flyers only |
Global Entry is the most popular choice for international travelers. It includes TSA PreCheck®, so you get expedited security for domestic legs as well. If you fly internationally at least once a year, this is usually the best value.
NEXUS and SENTRI are regional. NEXUS is ideal if you frequently cross the Canadian border, while SENTRI serves the Mexican border. Both include Global Entry benefits, making them powerful cards for frequent cross-border commuters.
TSA PreCheck® is strictly for domestic security lines. It does not help with customs clearance upon returning from abroad. Choose this only if you never leave the country.

List your international and domestic flights for the past two years. This determines which program offers the most utility. If you only fly domestically, skip Global Entry and apply for TSA PreCheck® directly to save money.
Ensure you are a U.S. citizen, lawful permanent resident, or eligible citizen of a partner country. Some programs, like NEXUS, require background checks from both the U.S. and Canada. Verify your status on the official TTP website before proceeding.
You must apply through the official DHS portal. Create a user profile, fill out the application form, and pay the non-refundable fee. Keep your Application Control Number handy for scheduling your interview.
Create your DHS login and profile
Before you can submit an application for a Global Trusted Traveler Card, you must establish a verified identity through the official Trusted Traveler Programs (TTP) portal. This account serves as your single point of entry for all DHS travel programs, including Global Entry, NEXUS, and SENTRI. The system relies on Login.gov for authentication, ensuring that your personal data is handled with federal security standards.
Start by visiting the official TTP website and selecting "Create Account." You will need a valid email address and a mobile phone number capable of receiving two-factor authentication codes. The verification process is strict; if you miss a step, the system will lock you out until you reset your credentials. Do not use a shared email address, as this can delay or complicate the identity verification process.
Once logged in, you will complete your profile. This is not a place to be creative. Enter your name, date of birth, and passport information exactly as they appear on your official documents. Any discrepancy between your profile data and your physical passport will result in application rejection or delays at the border. Treat this profile as the foundation of your application.
Go to the Trusted Traveler Programs website. Click the "Create Account" button located in the top right corner. This redirects you to the Login.gov secure identity verification page.
Upload a photo of your government-issued ID and passport. Follow the prompts to verify your phone number via text or call. Ensure your lighting is good to avoid upload errors.
Fill in your name, address, and emergency contact information. Double-check every field against your passport. Save your progress frequently to prevent data loss.
With your account active and profile verified, you are ready to begin the actual application. The next step involves filling out the detailed application form, which requires additional personal history and employment information. Keep your login credentials secure, as you will need to return to this portal to schedule your interview.
Complete the online application form
The Global Entry application is the most critical step in securing your trusted traveler status. You will complete this process through the Trusted Traveler Programs (TTP) website, which serves as the central portal for Global Entry, TSA PreCheck, NEXUS, and SENTRI applications. The form is comprehensive, and accuracy is non-negotiable; even minor discrepancies can trigger additional review or denial.
Start by gathering your personal identification documents. You will need your current passport number, date of birth, and citizenship details. If you hold dual citizenship or have changed your name, ensure all aliases are listed exactly as they appear on your legal documents. The system cross-references this data against federal databases, so consistency is key to avoiding delays.
Employment and travel history
The application requires detailed information about your employment and past travel. You must list your current employer, job title, and work address. If you are self-employed, provide your business name and registration details. For previous employers, list the last five positions held, including dates of employment. This helps establish your professional stability and background.
You will also need to provide your international travel history for the past five years. Include countries visited, dates of entry and exit, and the purpose of each trip. If you have ever had a visa denied or revoked, or if you have ever been arrested or cited for a violation of the law, you must disclose this information. Hiding negative history is a common mistake that leads to automatic disqualification.
Passport validity and submission
Before submitting, verify that your passport is valid for at least six months beyond your intended stay. While the application itself does not require uploading the passport scan immediately, you must present the physical document during your interview. An expired or soon-to-expire passport can complicate the approval process.
Once all fields are complete, review the entire application carefully. Submit the form and pay the non-refundable $100 fee. You will receive a confirmation email with your application number. Keep this number safe, as you will need it to schedule your in-person interview at a enrollment center. The average wait time for an interview can vary significantly by location, so apply as early as possible.
Pay the non-refundable fee
Before your application is processed, you must pay the non-refundable fee for your chosen program. This payment confirms your submission and initiates the background check. You can pay online using a credit card, debit card, or electronic check through the official Trusted Traveler Programs portal.
The current fees vary by program:
- Global Entry: $100
- TSA PreCheck®: $78
- NEXUS: $50
- SENTRI: $122
These fees are non-refundable, even if your application is denied or your interview is cancelled. Plan your budget accordingly, as you will not get your money back if the government decides you are ineligible. Keep your receipt for your records, as it serves as proof of payment for your application status.
Schedule your enrollment interview
Your Global Trusted Traveler application moves to the final stage once you book an enrollment interview. This step is mandatory for most applicants, but the process differs depending on whether you are currently traveling or waiting from home. You will use the Trusted Traveler Programs (TTP) online portal or the mobile app to select a time and location.
Book your appointment online
Log in to your TTP account and navigate to the "Appointments" section. You can search for enrollment centers by city or airport. Most centers offer weekday and weekend slots, but availability varies by location. If your preferred center shows no open dates, try nearby airports or larger hubs, which often have more frequent interview times.
When you select a slot, you will need to bring your current passport and the conditional approval letter generated after your application is accepted. The interview typically lasts 10 to 15 minutes and includes a brief question-and-answer session and biometric capture. If you need to reschedule, do so at least 24 hours in advance to avoid losing your spot or incurring penalties.
Use Enrollment on Arrival
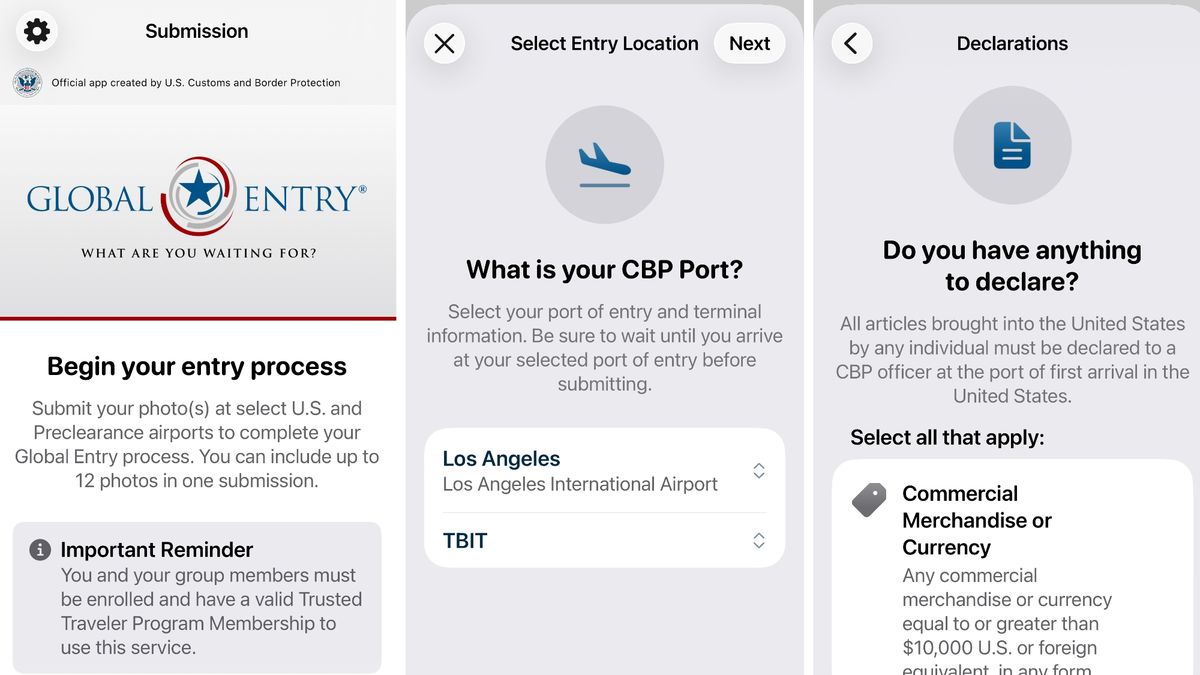
If you are already in the United States when your application is conditionally approved, you may be able to skip the long wait for a standard appointment. Enrollment on Arrival (EoA) allows you to complete your interview at designated airports upon international arrival. Look for the Global Entry kiosk or ask a Customs and Border Protection officer about EoA availability at your specific terminal.
This option is only available at participating airports and is subject to officer discretion and staffing levels. It is not guaranteed, so do not rely on it as your primary plan if you have strict travel deadlines. However, if you are traveling internationally soon and receive conditional approval, EoA can save you weeks of waiting.
Handle waitlists and delays
Appointment slots fill up quickly, especially during peak travel seasons. If all available times are taken, join the waitlist for your preferred center. You will receive an email notification if a cancellation opens up. Check your inbox regularly, including the spam folder, and be ready to book immediately.
If you cannot secure an appointment within a reasonable timeframe, consider applying for a different Trusted Traveler Program if you qualify, or wait for new slot releases. Some centers add new appointment times weekly. For the most accurate scheduling instructions and status updates, refer to the official Trusted Traveler Programs website.
Wait for your application status to change to "Conditionally Approved" before attempting to schedule. You cannot book an interview until this status appears in your TTP account.
Log in to the TTP portal, go to Appointments, and search by city or airport. If your first choice is full, try nearby locations or larger hubs with higher volume.
Bring your passport and conditional approval letter to the interview. If using Enrollment on Arrival, look for the Global Entry kiosk or ask a CBP officer upon arrival.
Prepare for the biometric interview
The final step in securing your Global Trusted Traveler Card is the in-person interview. This is where a CBP officer verifies your identity and collects your biometrics. Arriving prepared turns this routine check into a quick process, often taking less than ten minutes.
What to bring
Bring only the documents explicitly required by the application. Extra paperwork slows down the line. The officer needs to see:
- Your current passport or permanent resident card
- A document proving legal name changes (if applicable)
- Your application receipt number (if available)
Keep these documents in a single folder or envelope. Do not submit copies unless specifically asked. The officer will scan the originals and return them immediately.
How to behave
Treat the interview like a standard customs check. Dress neatly and speak clearly. Answer questions truthfully and concisely. If you are unsure of an answer, say so rather than guessing. The officer is looking for consistency between your application and your verbal responses.
Arrive 15 minutes early to fill out any final forms. Late arrivals may be rescheduled, delaying your approval. Once the interview is complete, your card will be mailed to your address within a few weeks.
Collect your passport, residency card, and receipt number in one folder before leaving home.
Get to the enrollment center 15 minutes before your appointment to handle any last-minute paperwork.
Present your documents, answer questions truthfully, and provide fingerprints and a photo.
Global Trusted Traveler Card FAQs
How long does Global Entry approval take?
Most applicants receive approval within a few weeks of their interview. However, processing times fluctuate based on staffing and application volume. You can check your status directly on the Trusted Traveler Programs website, which is the official source for real-time updates.
What happens if my Global Entry application is denied?
Denials usually stem from incomplete information or disqualifying criminal history. You will receive a letter explaining the reason. In some cases, you can appeal the decision or reapply after addressing the specific issue cited in the denial letter.
How long is a Trusted Traveler Card valid?
Global Entry, NEXUS, and SENTRI memberships last for five years. TSA PreCheck is valid for five years as well. You must renew before expiration to maintain your benefits. Late renewals may result in a gap in coverage during the processing period.
No comments yet. Be the first to share your thoughts!