
Choose your trusted traveler program
The term "Global Trusted Traveler" refers to a group of specific U.S. Customs and Border Protection (CBP) programs designed to expedite travel for pre-approved, low-risk individuals. These programs include Global Entry, TSA PreCheck, NEXUS, SENTRI, and FAST. While they share the same goal of speeding up border and security processing, each serves a different travel pattern and budget.
Global Entry is the most popular choice for international travelers because it includes TSA PreCheck benefits. If you fly internationally at least once a year, Global Entry is usually the best value. NEXUS is ideal for frequent travelers between the U.S. and Canada, offering similar benefits to Global Entry plus expedited entry at land borders. TSA PreCheck is strictly for domestic security lines and does not help with customs or international entry.
To decide which program fits your needs, compare the core differences below. The official Trusted Traveler Programs website provides the most accurate and up-to-date eligibility details for each option.

| Program | Cost | Coverage | Best For |
|---|---|---|---|
| Global Entry | $100 / 5 years | U.S. Customs + TSA PreCheck | International travelers |
| TSA PreCheck | $78 / 5 years | Domestic security lines only | Domestic flyers |
| NEXUS | $50 / 5 years | U.S./Canada land & air | U.S.-Canada travelers |
| SENTRI | $122 / 5 years | U.S./Mexico land borders | U.S.-Mexico commuters |
Create your DHS account
Before you can apply for Global Entry, you need a single account on the Trusted Traveler Programs (TTP) website. This account acts as the hub for all your interactions with federal agencies, including TSA PreCheck and NEXUS applications. Think of it as your digital passport file; if the data here is messy, every future application will be too.
Start by visiting the official TTP website. Look for the "Create Account" button, usually located in the top right corner. You will be redirected to Login.gov, a secure identity verification service used by multiple federal agencies. Do not skip this step or try to use a third-party agent’s portal; only the official DHS site guarantees your data goes directly to the government.
Click the create account link and follow the prompts to set up your Login.gov credentials. You will need to verify your identity using a smartphone camera to take a photo of your government-issued ID and a selfie. This biometric check ensures that the person creating the account is the person they claim to be.
Once Login.gov verifies your identity, you will be returned to the TTP dashboard. Your new account is now linked. Take a moment to review your profile settings. Ensure your email address is correct, as all future correspondence, including interview invitations, will go to this inbox.
Fill in your legal name, date of birth, and citizenship status exactly as they appear on your passport. Even a single typo in the middle name or a misspelled city can cause delays or require a manual correction later. Double-check every field before saving. This data is what the system uses to run your background check.
After completing these steps, your account is ready for the application phase. Keep your Login.gov credentials safe; you will need them to log in, check your application status, and renew your membership in the future.
Complete the online application form
The Global Entry application lives on the Trusted Traveler Programs (TTP) website. You will need a login.gov account to access the portal. This is where you provide the personal data that CBP uses to vet your eligibility. Accuracy here is critical; even small discrepancies can trigger manual reviews or outright rejections.
Before you start, gather your current passport and a list of your travel history for the past five years. You will also need your Social Security Number and your employer’s name and address. If you are a U.S. citizen, you can apply from anywhere in the world. Non-citizens must apply from their country of citizenship or legal permanent residence.
Create a login.gov account if you do not already have one. This single sign-on system secures your application data. You will need to verify your identity through this platform before accessing the TTP application form.
Fill in your full legal name, date of birth, and contact information. Ensure your name matches your passport exactly. Include any aliases or nicknames you commonly use, as this helps officers identify you during interviews.
List all international trips taken in the last five years. Include the country, dates of entry and exit, and purpose of travel. You must also list your current employer’s name, address, and your job title. Gaps in employment or travel history may require additional explanation.
You can add your spouse and children to your application if they are under 18. They do not need separate applications. Provide emergency contact information for at least one person who is not a family member. This person should be reachable during business hours.
Review every field carefully. Submit the application and pay the non-refundable $100 fee. You will receive a confirmation email with your application number. Check your status regularly on the TTP website; most applications are processed within a few weeks, but some may take longer.
Common errors include misspelled names, incorrect passport numbers, and incomplete travel histories. If your application is denied, you will receive a letter explaining the reason. You can appeal the decision or reapply after addressing the issues. Keep copies of all submitted documents for your records.
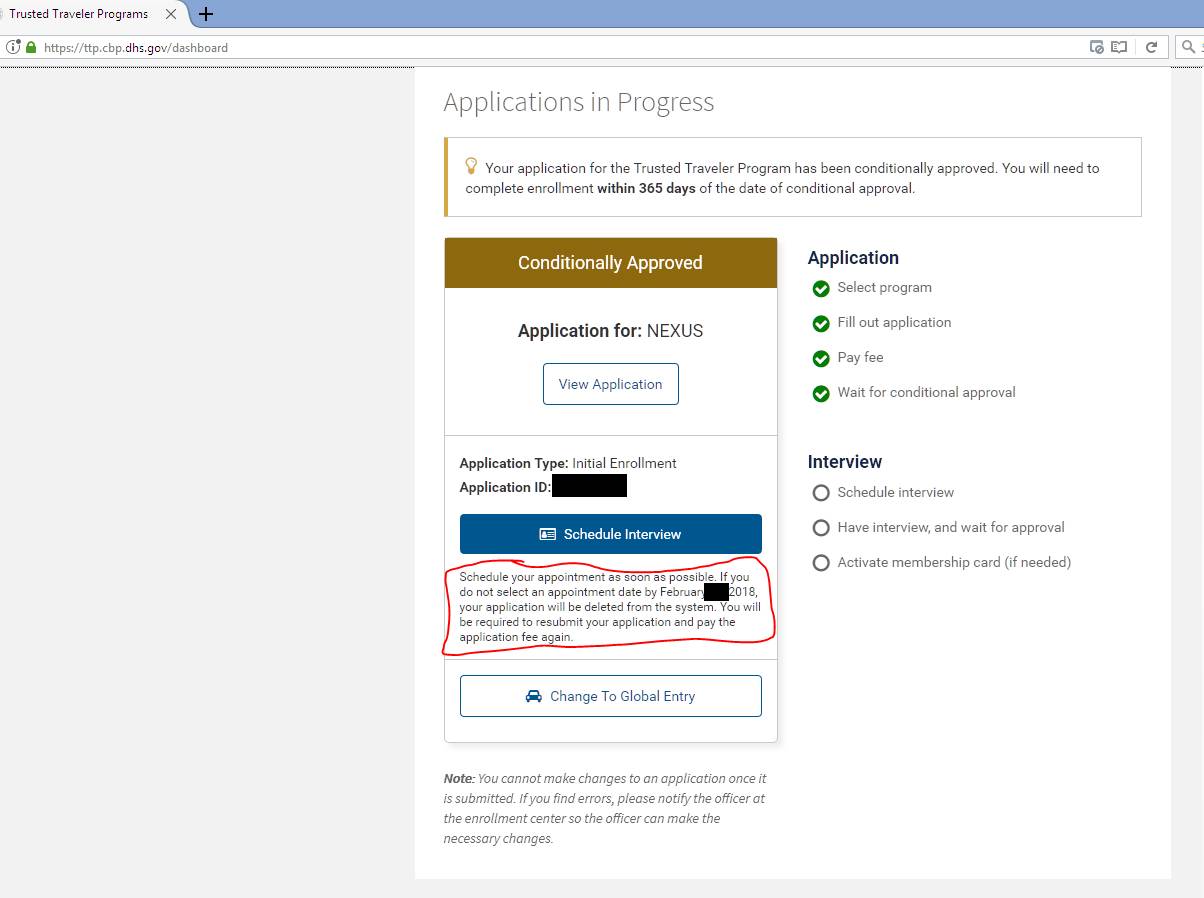
Schedule your enrollment interview
Once your Global Entry application moves to conditional approval, the next step is booking an in-person interview. This is the final hurdle before you receive your Known Traveler Number (KTN) and can start using expedited lanes at airports and borders.
You can schedule this appointment through the Trusted Traveler Programs (TTP) online portal. The system displays available slots at nearby Enrollment Centers. If you don’t see a time that works, check back frequently; cancellations often open up new slots, especially during weekdays or early mornings.
Use Enrollment on Arrival
If you are already traveling internationally, you might not need to visit a center beforehand. Enrollment on Arrival allows eligible Global Entry applicants to complete their interview at designated U.S. preclearance locations or major international airports upon entry. This option is available at select airports across the country, including Chicago O’Hare (ORD), New York JFK, and Washington Dulles (IAD). Simply inform the CBP officer at the kiosk or booth that you are a conditional applicant requesting an Enrollment on Arrival interview.
What to Bring
Bring your original documents. You must present a valid passport or U.S. permanent resident card. If you have a driver’s license or other government ID, bring it as well, though the passport is the primary requirement. If your name has changed since you applied (due to marriage, divorce, or legal action), bring the legal document proving the change, such as a marriage certificate or court order.
Navigate to the Trusted Traveler Programs website and sign in with your credentials. Locate the "Schedule Interview" button on your dashboard. This will redirect you to the CBP appointment system where you can view real-time availability.
Choose an Enrollment Center near your home or current location. Review the available dates and times. If the first choice is too far in the future, try a different center or check for earlier cancellations. Confirm your selection once you find a slot that fits your schedule.
Gather your valid passport, permanent resident card (if applicable), and any name-change documents. Print your appointment confirmation email. Arrive 15 minutes early to allow time for security screening and check-in at the enrollment center.
Prepare for the biometric scan
The final step in your Global Entry application is the in-person interview. This is where you verify your identity and provide biometric data. Expect to spend about 10 to 15 minutes at the kiosk or with an officer, though wait times can vary significantly depending on the airport and time of day.
Arrive 10 minutes before your scheduled appointment. Late arrivals may be rescheduled, delaying your expedited clearance. Bring your required documents: a valid passport and your conditional approval letter.
An officer will scan your fingerprints and take a digital photograph. This process is quick and routine. Ensure your hands are clean and dry for the best scan results. The photo is taken on-site to update your profile.
The officer will ask a few standard questions about your travel history and employment. Answer honestly and concisely. If everything is in order, you will receive your membership card in the mail within a few days.
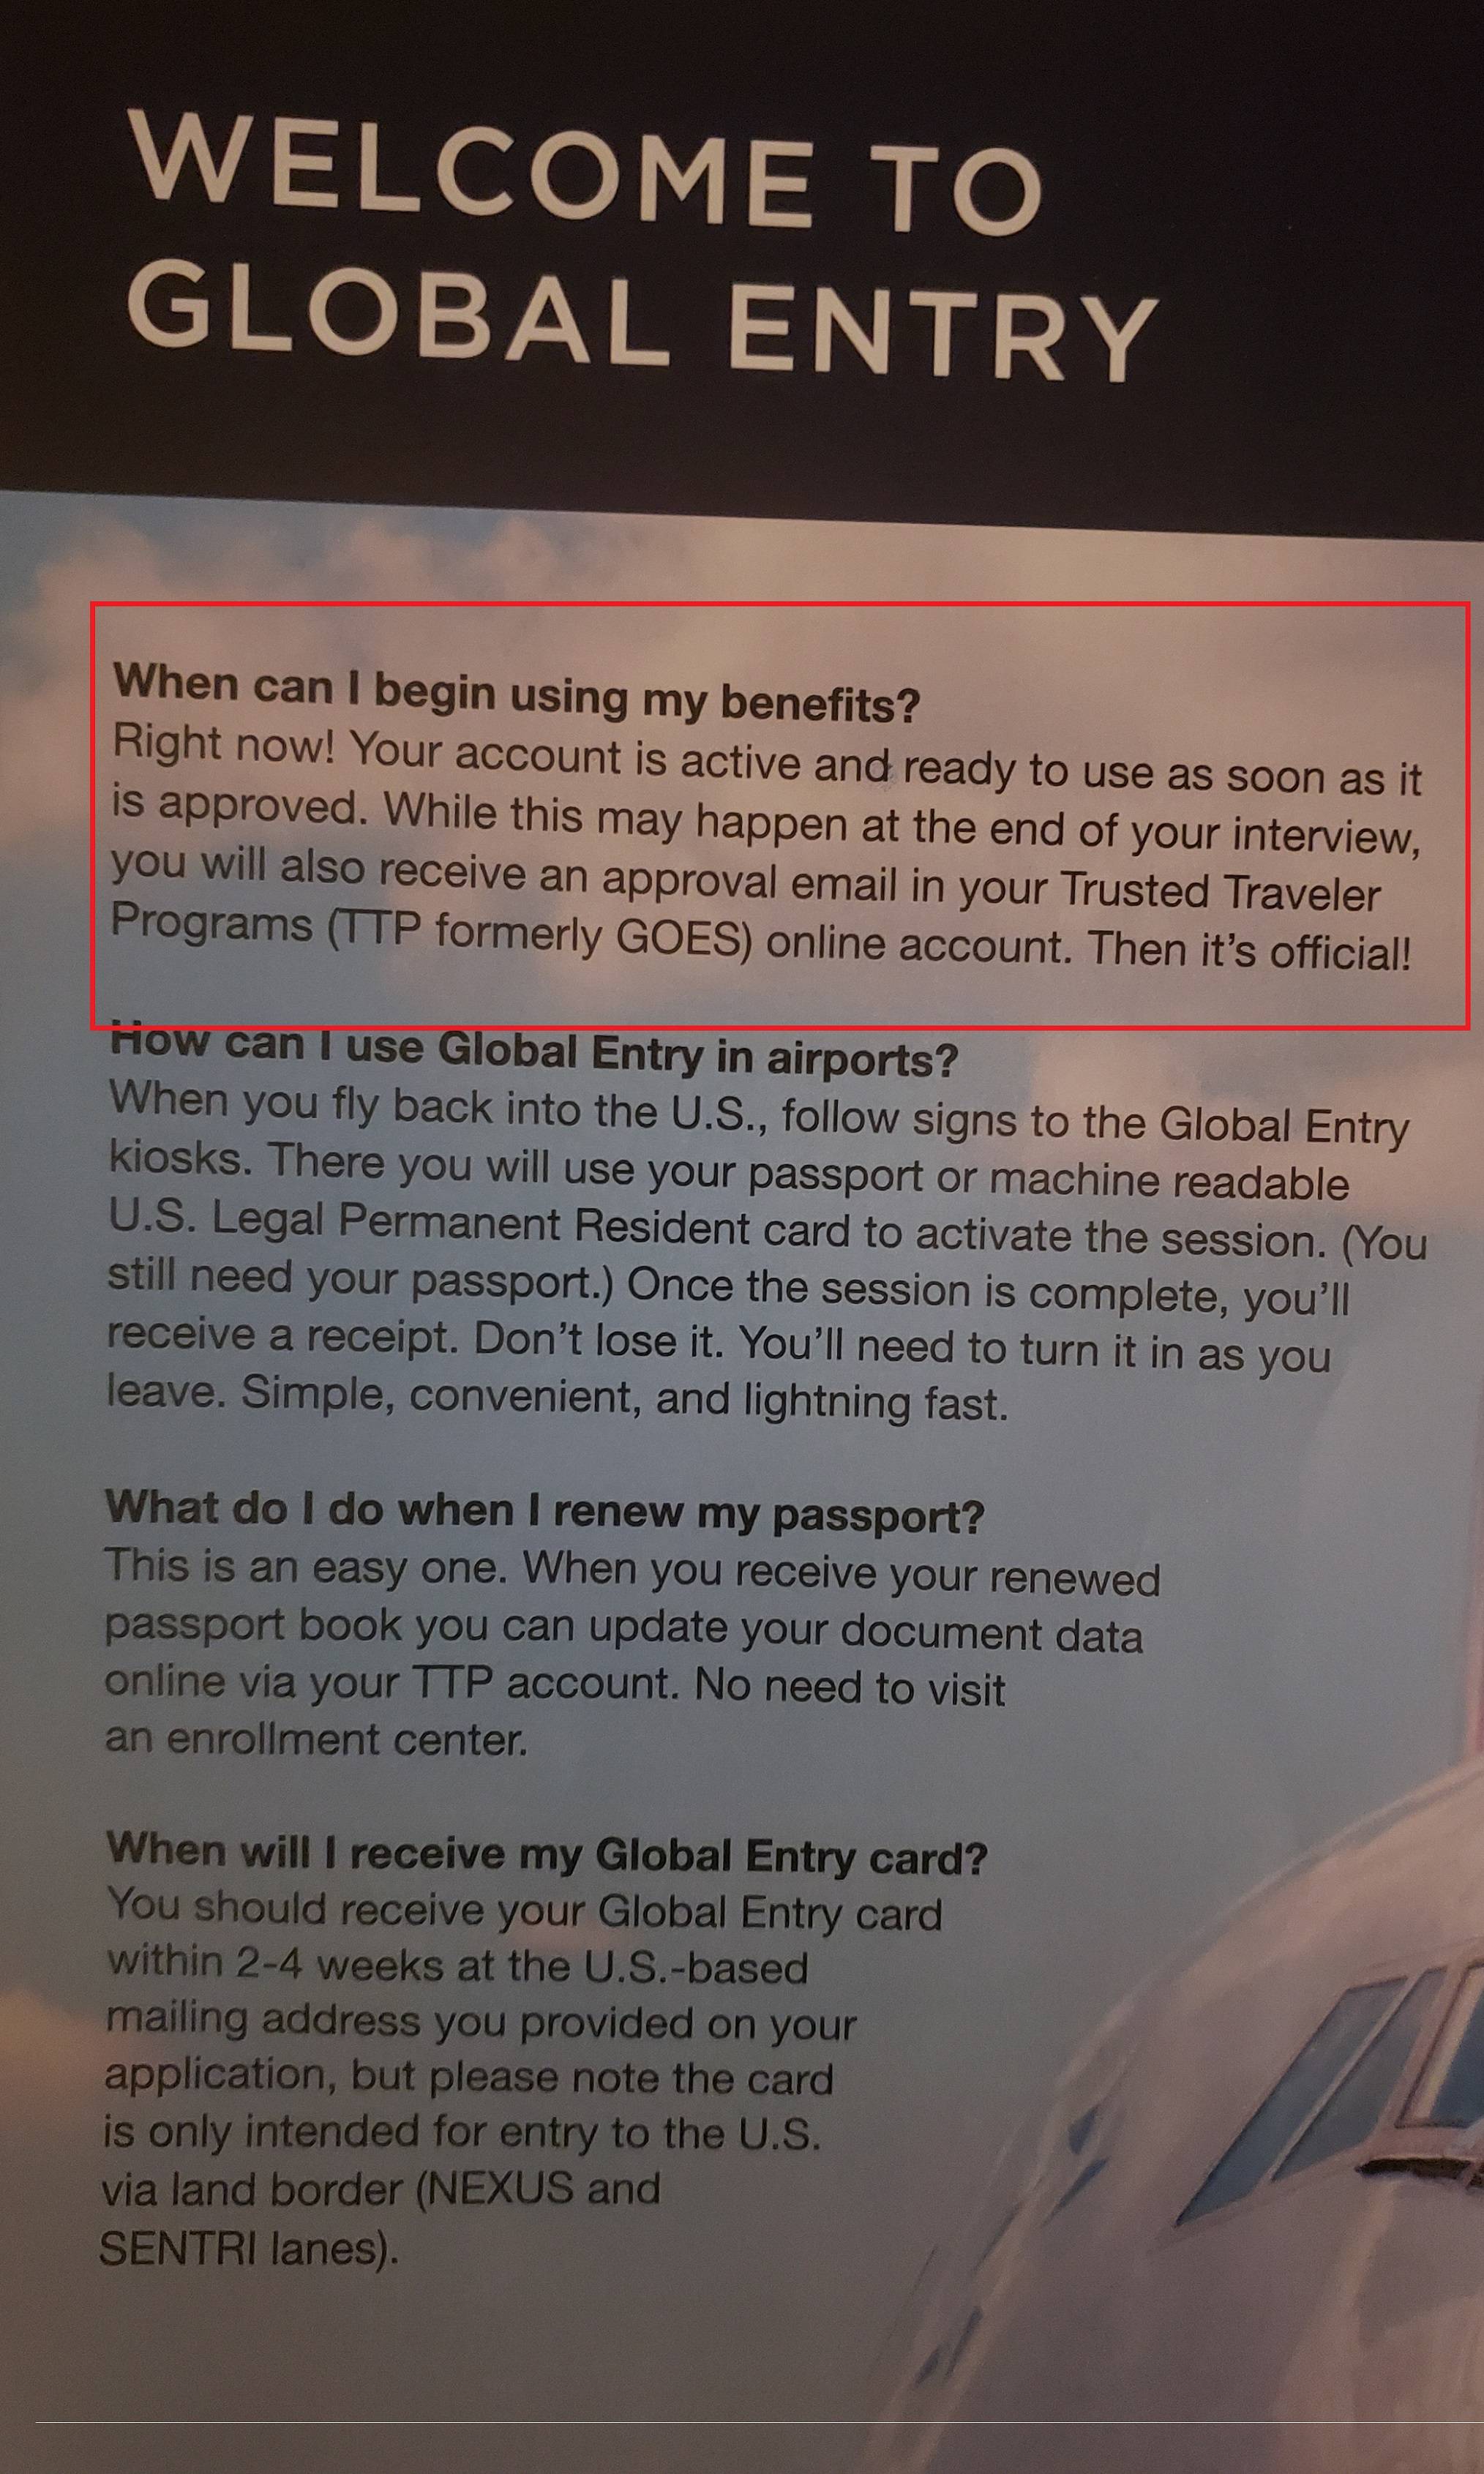
If your application is approved on the spot, you will receive a Known Traveler Number (KTN) almost immediately. You can use this number to book flights and enjoy expedited screening at participating airports. If additional review is needed, you will be notified by mail.
Use your Global Trusted Traveler card and number
Once your application is approved, you will receive a Trusted Traveler Number (TKN). This number is your primary identifier for the Global Entry program. You should enter this number when booking international flights to ensure your status is attached to the reservation. This allows airlines to share your pre-approved status with customs authorities before you land.
While the physical Global Entry card is useful, it is not always necessary for entry into the United States. When arriving by air, you only need your passport and boarding pass to use the kiosks. The physical card is primarily required when entering the U.S. by land or sea from Canada, Mexico, or the Caribbean. In those cases, the card serves as a valid WHTI-compliant document.
Keep your TKN handy for future travel. If you forget it, you can retrieve it from your CBP Trusted Traveler Accounts online profile. Having this number ready speeds up the check-in process and helps avoid delays at the border.
Common Global Entry Application Mistakes
Even small errors on your Global Entry application can trigger extended background checks, delaying your approval by weeks or months. The system relies on precise data matching; inconsistencies are red flags, not just typos.
The most frequent pitfall is incorrect employment dates. If your start and end dates do not align exactly with your W-2s or tax returns, the review team must manually verify your history. Double-check every month and year against official documents before submitting.
Another common error is omitting past travel history. If you have visited countries that require visas, failing to list them creates a gap in your profile. Be thorough. Include every trip, even short vacations, to ensure your record is complete and transparent.
No comments yet. Be the first to share your thoughts!